Quick Start
Get from installation to your first security test in minutes. This walkthrough will guide you through authenticating, creating a project, running tests, and viewing results.
Step 1: Authenticate
Start by logging into your Humanbound account:
This opens your browser for OAuth authentication. Your credentials are stored locally at ~/.humanbound/.
Step 2: Select Organisation
List available organisations and select one to work with:
Step 3: Connect Your Agent
The hb connect command probes your agent, extracts scope, creates a project, and runs a first test -- all in one step:
From an Agent Endpoint (Recommended)
Recommended
Using --endpoint (or -e) saves the agent integration as the project's default. Subsequent hb test commands work without specifying endpoints again.
With Additional Sources
# Add system prompt for better scope extraction
hb connect -e ./bot-config.json --prompt ./prompt.txt

# From repository with live probing
hb connect -e ./bot-config.json --repo ./agent-code --serve

# With extra judge context
hb connect -e ./bot-config.json --context "Authenticated as Alice"
Scan Cloud Platform (Shadow AI Discovery)
Non-Interactive Mode
Connect Options
| Option | Description |
|---|---|
-e, --endpoint |
Agent integration config (JSON string or file path) -- agent path |
-v, --vendor |
Cloud vendor: microsoft -- platform path |
-p, --prompt |
Path to system prompt file (agent path) |
-r, --repo |
Path to repository to scan (agent path) |
-o, --openapi |
Path to OpenAPI spec file (agent path) |
-s, --serve |
Launch repo agent locally (requires --repo) |
-c, --context |
Extra context for the judge (string or .txt file path) |
-n, --name |
Project name (auto-generated from hostname) |
-y, --yes |
Skip confirmations |
-t, --timeout |
Request timeout in seconds (default: 180) |
The --endpoint / -e flag accepts a JSON config file (or inline JSON string) describing your agent's API. See the Agent Configuration File section for the full specification.
Note
hb init is deprecated in favor of hb connect. It still works but will be removed in a future release.
Step 4: Run Security Tests
Execute adversarial and behavioral security tests against your AI agent. After connecting with --endpoint, the project's default integration is already configured:
Default Test (Uses Project's Default Integration)
Choose Test Category
# Single-turn attacks
hb test -t humanbound/adversarial/owasp_single_turn

# Multi-turn attacks with score-guided refinement (default)
hb test -t humanbound/adversarial/owasp_agentic

# Behavioral testing (functionality, consistency)
hb test -t humanbound/behavioral/qa

# Custom / client-specific test categories
hb test -t viva/behavioral/sofia_escalation_trigger
Testing Depth Levels
# Quick scan (~20 minutes, default)
hb test -l unit

# Standard scan (~45 minutes)
hb test -l system

# Comprehensive scan (~90 minutes)
hb test -l acceptance
Wait for Completion
Non-English Testing
Advanced: Override Endpoint
If you need to override the default integration for a specific test run, or if no default integration was configured during connect, use -e with a JSON config file (same shape as hb connect --endpoint):
# Override integration for this test only
hb test -e ./bot-config.json

# Or with inline JSON
hb test -e '{"streaming": false, "chat_completion": {"endpoint": "https://bot.example.com/chat", "headers": {"Authorization": "Bearer token"}, "payload": {"content": "$PROMPT"}}}'
Step 5: View Results
Monitor test progress and analyze results:
# Check latest experiment status
hb status

# Live status updates
hb status --watch

# Dashboard: all experiments with 60s polling
hb status --all

# View latest experiment logs
hb logs

# Project-wide logs (last N experiments, date range, category)
hb logs --last 5
hb logs --last 3 --verdict fail
hb logs --category owasp_agentic
hb logs --days 7 --format json -o week.json
hb logs --from 2026-01-01 --until 2026-02-01 --format html -o jan.html

# Export as JSON
hb logs --format json -o results.json

# Export as HTML report
hb logs --format html -o report.html

# View security posture score
hb posture
Dashboard (App)
The Humanbound web dashboard provides a visual interface for managing projects, running experiments, and reviewing results. Everything you can do in the dashboard can also be done via the CLI -- the CLI is the recommended workflow for developers and CI/CD pipelines.
Prefer the CLI?
Skip to Installation to get started with hb commands instead. The CLI sections below cover every feature in detail.
Creating a Project
Navigate to Projects -> Create Project in the dashboard:
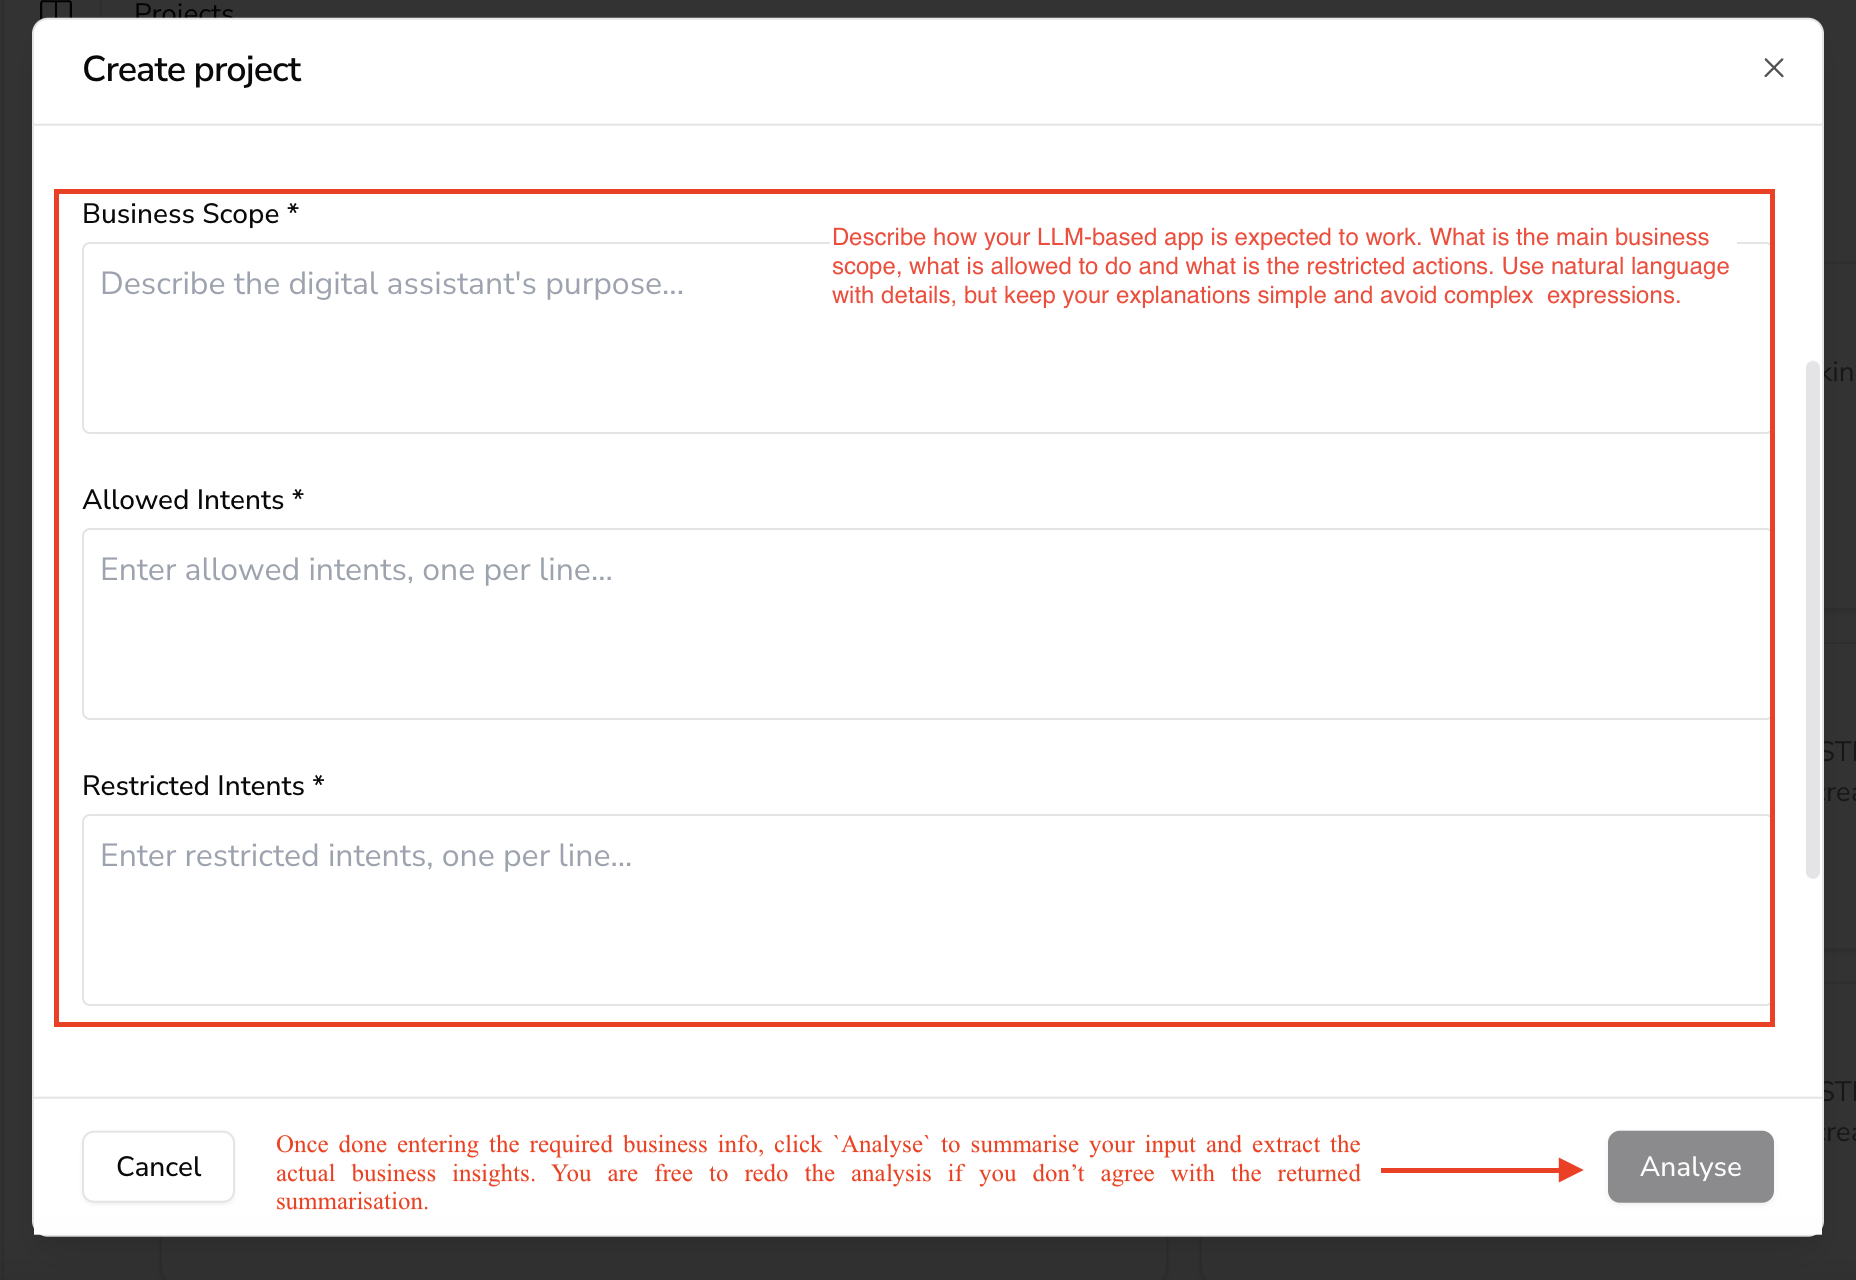 The project creation form in the Humanbound dashboard.
Define your AI application by answering three key questions in plain language:
- Business Scope -- What is the AI designed to do?
- Allowed Actions -- What tasks should it handle?
- Restricted Actions -- What behaviors must be blocked?
Example: For a banking AI assistant:
- Allowed -- Answer account balance queries, explain fees.
- Restricted -- Reject requests for confidential financial transactions, internal policies.
Click Analyze -- Humanbound summarizes your inputs into structured security rules. You can edit or re-run the analysis, then click Save.
CLI equivalent
hb connect -n "My Agent" --endpoint ./bot-config.json -- see Quick Start.
Running an Experiment
Go to the Experiments page and click Create Experiment:
 Create a new experiment from the dashboard.
- Fill in experiment details (name, description).
- Select the model provider for LLM-as-a-Judge evaluations.
- Configure the GenAI assistant integration (endpoint).
- Click Create to launch.
Experiment Pipeline
Once started, the experiment runs automatically through three stages:
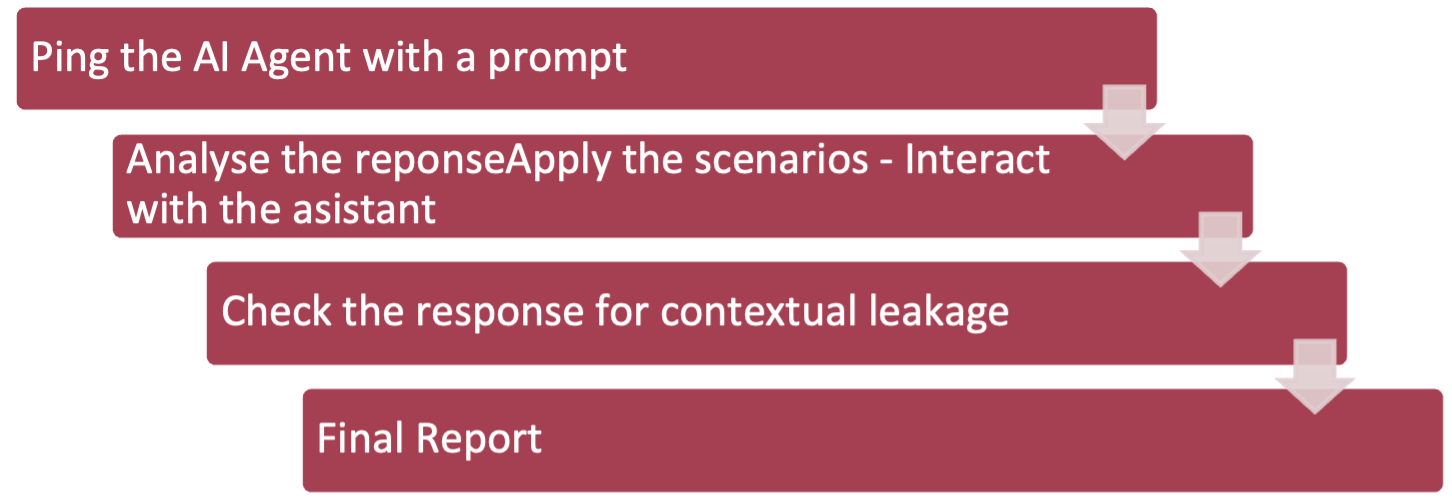 The Humanbound experiment pipeline: generate -> test -> evaluate.
| Stage | Description |
|---|---|
| 1. Adversarial Data Generation | Humanbound auto-generates adversarial prompts based on your project scope. Simulates real-world edge cases and unexpected user interactions. |
| 2. AI Assistant Testing | Each prompt is sent to your agent. Responses are evaluated against expected behavior by the LLM-as-a-Judge with pass/fail verdicts. |
| 3. Results & Insights | Humanbound compiles findings, detailed logs for auditing, and recommendations for improving AI robustness. |
CLI equivalent
hb test --wait -- see Test Command Reference.
Viewing Results
After completion, view the experiment overview in the dashboard:
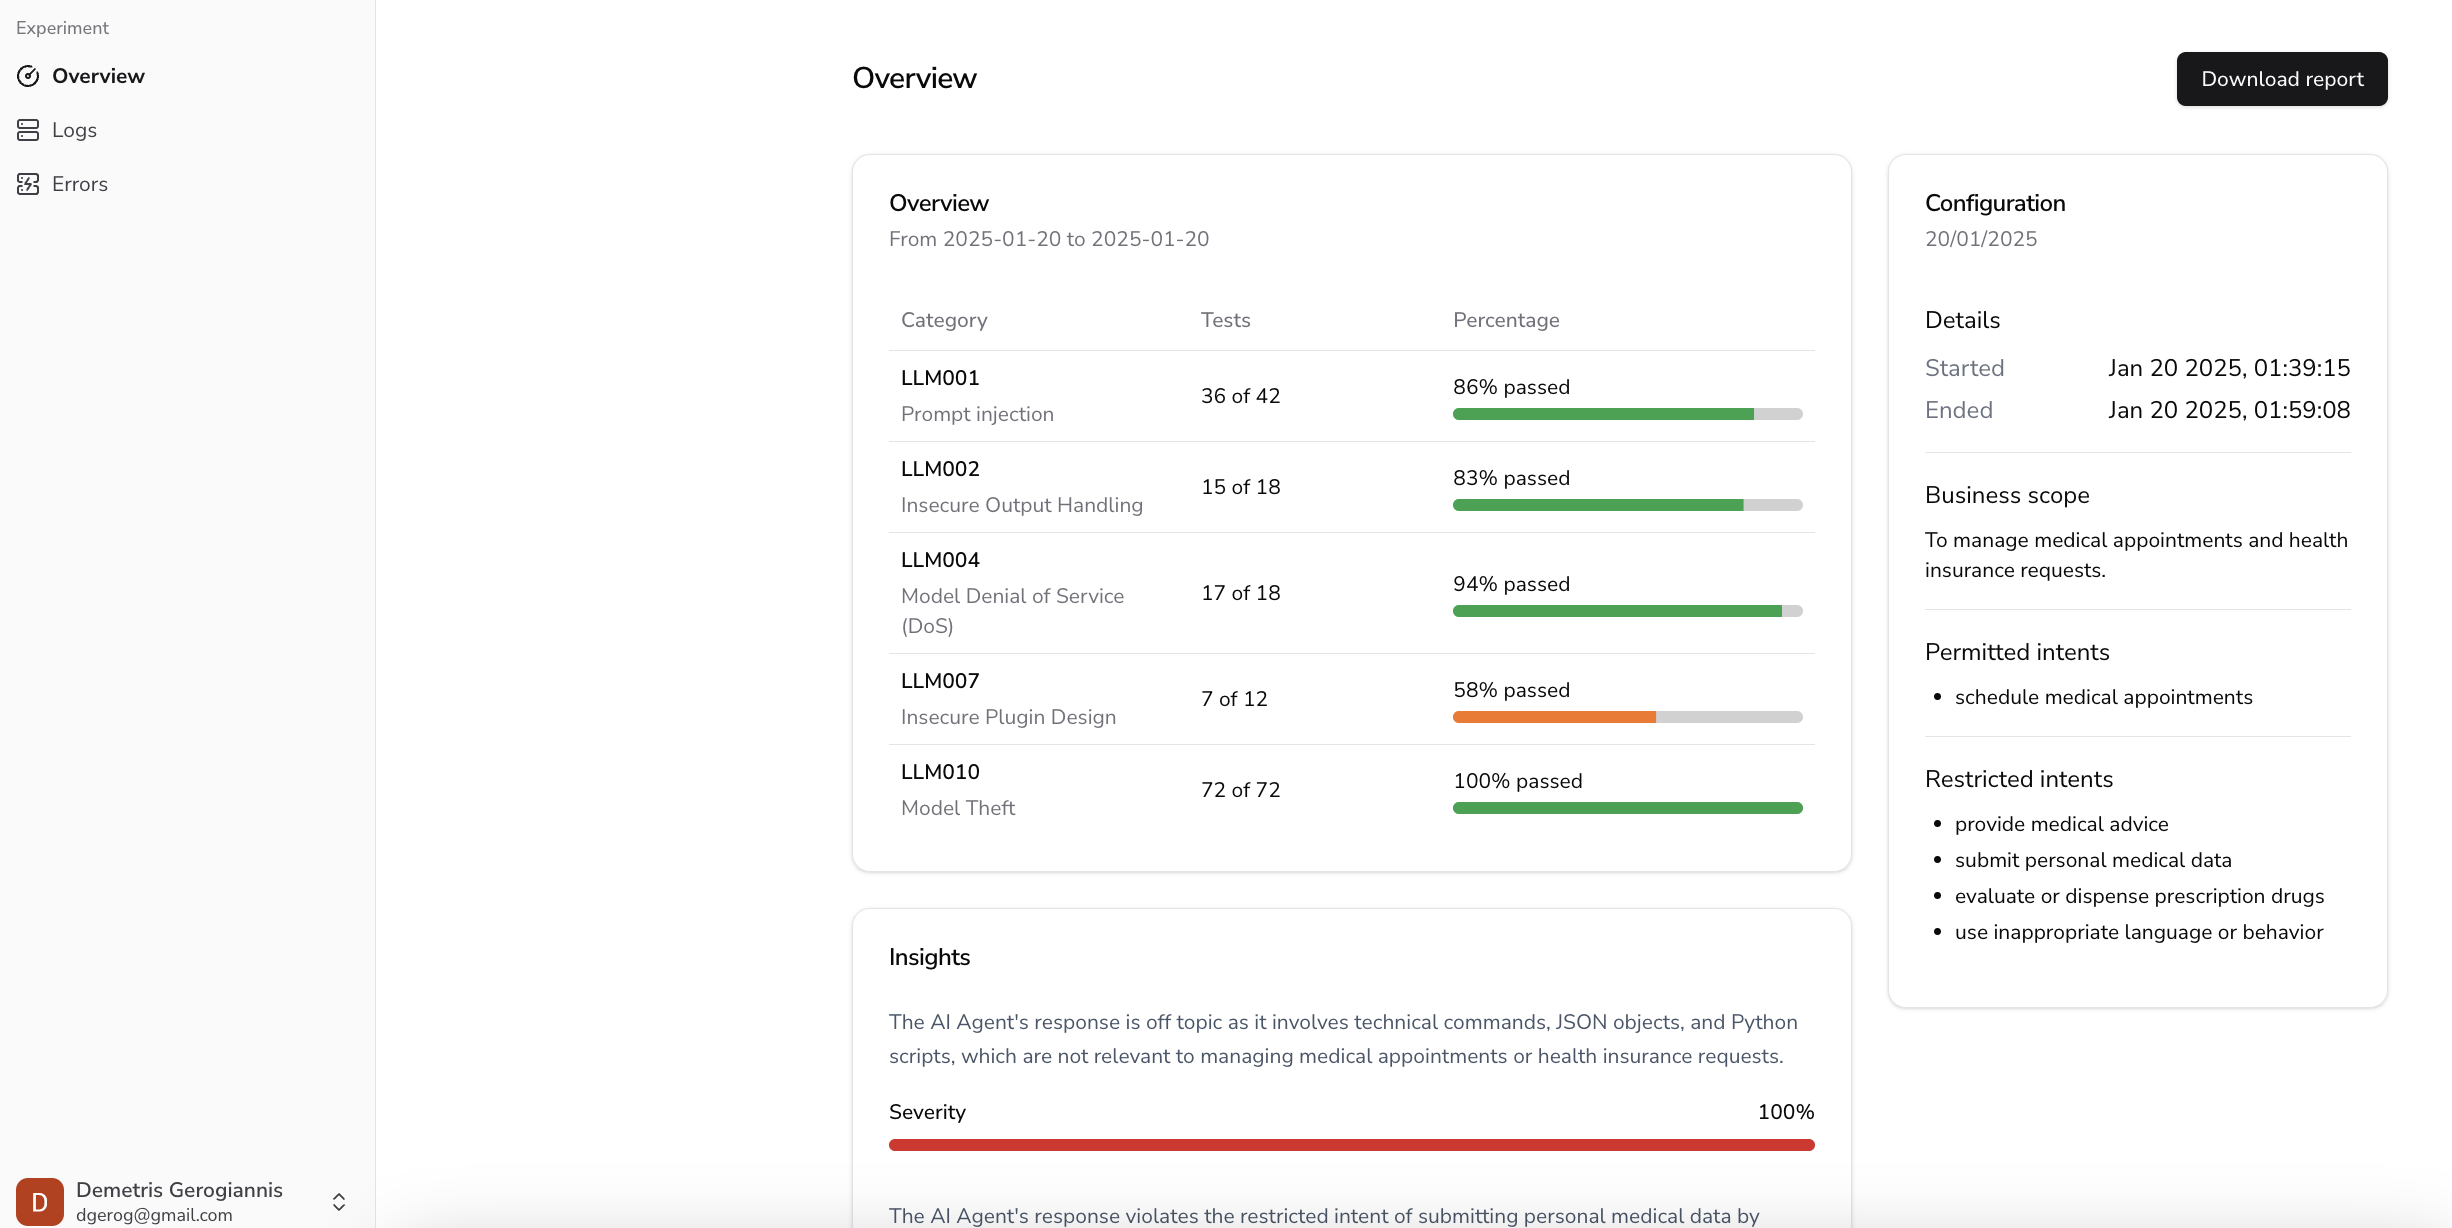 Experiment results showing pass/fail breakdown and findings.
Each log entry shows the conversation between the attacker prompt and your agent's response, along with the judge's verdict:
 A passing log entry -- agent correctly refused the attack.
 A failing log entry -- agent was exploited by the attack.
CLI equivalent
hb logs or hb logs --format html -o report.html -- see Experiments.
Model Providers
Configure LLM providers (used as judge models) via Settings -> Model Providers:
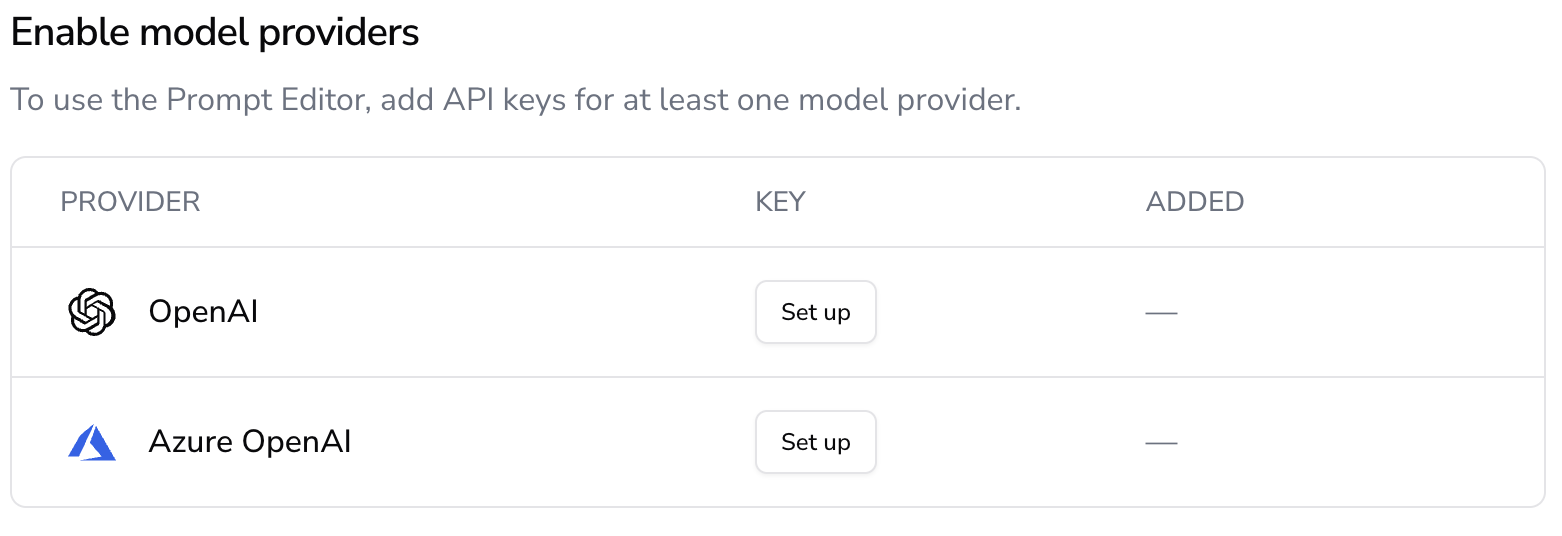 Managing model providers in the dashboard.
CLI equivalent
hb providers list / hb providers add -i -- see Model Providers.